Friday, August 31, 2012

Extremely Good Smoothie: Chocolate Edition

You may have read my blog about the smoothies that I make for my munchkins almost everyday to sneak in some spinach. If not, click here. This is the indulgent version that I do sometimes. It is certainly more calories than the regular smoothie, but it is not too unhealthy and of course has hidden spinach.

Here is what you do:
Depending on how much you want to make put 2-3 frozen bananas in the blender. (I use 3 because I want a lot of it!) They MUST be frozen or the consistency of your smoothie will be more like chocolate milk. Then add your big handful of spinach and if you like peanut butter, throw in a couple tablespoons of that. Go easy on the peanut butter if you are counting calories though because it is pretty high in calories. It does have protein though, so that is my excuse! Then pour in a little Dark Chocolate Almond Milk (or Chocolate Soy milk if you prefer), blend it up until the bananas and spinach are smooth. Then add more of the milk until you have it at the consistency that you like.

 Now enjoy your treat that is healthy enough to not feel guilty about! ;) My kids think it is a special treat. They were excited to wake up from their nap to these...
 Nate's still sleepy approval.
Adah's up in the camera thumbs up with her nap-time hair :)

Wednesday, August 29, 2012

Homemade Baby Wipes

I have been dying to tell the world about these! I first heard this mentioned on my sweet friend Karessa's facebook page and had planned on trying this on Josiah but I just got around to it a couple weeks ago. 

I will be honest, I was thinking that this was going to be something that I would endure to save money but that I would miss my Huggies Natural Care wipes. My husband and I are pretty picky about wipes. I think he is even pickier than I am. These wipes have been husband tested and approved! If he gives the green light to keep making something, I KNOW it is good! :) I was SHOCKED at how much I loved these!

So here is what you need: 

Viva paper towels (because they are strong and soft)
Baby Oil
Baby Wash
Water
A plastic container with a lid (size below)
Have a knife handy too

Here is what you do:

First cut the paper towel roll in half. DO NOT use a serrated knife. Rookie mistake, made a mess. Now you will have to take the cardboard roll out of the center. It takes a little work, but it is not a big deal to tear up the piece of paper towel that it is attached to, it will actually help you pull the first piece out of the center. How I get is out is by working my finger around it just pulling it out then pushing my finger down beside the cardboard. When it is separated from the paper towels fairly well, I just pull it out. When using the wipes you start with the center wipe. 

Now mix 2 cups or water, 2 Tablespoons baby oil, and 2 Tablespoons baby wash. I boiled the water and let it cool to make sure that it was sanitary especially since it is going to be sitting in a closed container. Pour the mixture into your container. (Make sure that the container is large enough to hold your half a roll of paper towels) Put the paper towels in on to of the mixture cut side down.

**Update: Someone asked what kind of container I used. I just found a washable plastic container the was large enough to hold the half roll of paper towels at Walmart that came in a 2 pack, which was perfect because I keep wipes upstairs and downstairs. No, a regular wipe container will not work unless you want to pull apart all of the paper towels to fit them in. However, if you want to use wipes that you can wash and reuse, you could use a wipe container. However, if you do this I would start with half of this recipe because it might actually be too much. Trial and error will get you there though!I just can't bring myself to do the yucky, time consuming task of washing baby wipes and diapers. You girls that do are amazing! Good for you (just not for me)!


After the fluid is completely soaked up, turn the container upside down. I don't remember how long I left it there the first time, but the second time when I went to get them I noticed that the top of the paper towels were not wet so I just turned it back upside down for a while. I would say leave it for an hour to be sure that they are ready and you can tell by looking and feeling if they are wet all of the way through. Then just turn them back up and enjoy.

I haven't done the math on this one yet, but I am positive that it saves money.I will eventually get around to doing the math and update this post, but I just couldn't wait to share this! Also, I can't pass up an opportunity to post a picture of my adorable baby! ;) I am just a little partial.


Friday, August 24, 2012

Pizza and a Movie Night! (whole wheat crust recipe)

Friday is my favorite day of the week because Friday night is our weekly Pizza and a movie night! I started out buying frozen pizzas then moved to the roll out canned dough and my own toppings, then a little over a year ago began looking for a homemade crust option. My son has had some gastrointestinal issues and a friend of mine who is a dietician suggested cutting out anything that has "enriched bleached white flour".  This is where my homemade whole wheat cooking journey started (because EVERYTHING has that!!) and I am so thankful because I have learned to make so many yummy things from scratch. One of these things is pizza crust.

**Also in this post: Sneaking in the spinach! :)

This requires a bread machine, so if you don't have one I am sorry! I have tried a couple recipes that don't use a bread machine but it never turns out this good, so I am probably doing something wrong! This one however is SO easy!
Here is your list:
1 cup + 2 Tablespoon water
2 Tablespoons Olive Oil
2 cups Whole Wheat Flour
1 cup White Wheat Flour
1 teaspoon Sugar
1 teaspoon Salt
1 packet of yeast

I love King Arthur brand flours and make sure that you DO NOT use the rapid rise yeast. 
I use this one: 


 Put all of it in your bread machine IN THAT ORDER (listed above). Do not mix it yourself. Just set the machine to do the mix cycle and the first rise. My bread machine does this in an hour and 40 minutes, but this may vary depending on the machine that you have. 


When it is done, take it out and place it on your lightly flowered counter top. Flour the top of it so that it does not stick to your roller, roll it out and you are ready!


Put it on your pizza stone or pan (if you don't have a stone, you need one, they are awesome) and now for the sauce. Here is where you get to sneak in some spinach. Sometimes I simply spread out the sauce and tear or cut up fresh spinach and put it on before the cheese and other toppings. However, the last time I did this I must have left the pieces too big because my picky little girl caught me! "What's this gween stuff?" "Um... that is just part of the seasoning in the sauce" "I don't like that" SIGH. Her most used dinner time phrase is  "i don't like that" usually BEFORE she has even tasted it. Sometimes while I am cooking she will come ask what's for dinner and when I tell her, she replies "I don't like that"


So, if you need to be sneaky, here is my suggestion (tested on the a fore mentioned super picky little girl): Cut up you spinach and put it is a sauce pan over low heat. Cook it until it starts wilting stirring it around every couple of minutes. 


When it is starting to look pretty wilty add your sauce and stir it in well. Leave it on low heat while you roll out your dough to heat a little more and further wilt (hide) the spinach.


When the dough is ready, spread out the sauce and then it is time to pile on the toppings! Here is how it looks like when spread: 


 <--Here are a few of our favorite toppings
My kids love when we have extra toppings because that meas that they get an appetizer. It is funny b/c the picky daughter sometimes picks the toppings off, but she will eat them raw by themselves... weirdo! ;)


Then bake at 400 degrees for 18 minutes and enjoy!  


Had to throw in a picture of my oldest 2 little monkeys enjoying pizza and a movie night!


Wednesday, August 22, 2012

Homemade Laundry Soap

I have gotten several inquiries about this homemade cleaner so here ya go!

Well, they say third time's the charm and it took 3 tries for me to find a laundry soap that I was happy with. I normally use liquid soap, so that is where I started.

First I tried this one. I did not like it.

Then I tried this one. It cleaned better but my hubby and I are training for a half marathon and our running clothes get really sweaty in this humid Houston heat (nice alliteration!) and I thought that our running cloths still smelled bad even after I washed them in this soap.

Now for the one I recommend, I gave up on doing a liquid and I am SO glad that I did. Not only is this one MUCH faster to make (no "cooking" required), it makes my clothes smell good! So I would like to tell you about this powdered lavender laundry soap. I got the recipe here. 

Here is what you need:

2 cups Borax
2 Cups Washing Soda
1 1/2 bars Fels Naptha soap OR 2 bars Ivory Soap
2 1/2lb Oxy Clean
30 drops lavender essential oil 

Side note: You know how I hate having to drive all the way to HEB to get some strange item on a recipe, like essential oils??? Good news! They are building one right down the road from me! WOO HOO!) Okay, moving on...


Here's what you do: 


 First you need to grate the soap. This was taking FOREVER (forever, forever..Sandlot, anyone?) So I decided to pull out my food processor. I used this grate tool but it was no fine enough so after that I put the already grated soap in the processor with just the normal blades and that did the trick.


Now just mix all of the ingredients and TA-DA! You're done! I will say that the borax was a little clumpy so I used my potato smasher to help break it up while mixing. At least that poor smasher is getting used for something. My hubby probably wishes it was for potatoes more often! ;)


Now you just use 1-2 Tablespoons per load but put the soap in the empty machine, let it fill with water so that it dissolves, THEN add the laundry.I know this is a little less convenient, but come on, isn't it worth saving money?

How much money? Well not quite as much as the 2 liquid recipes I tried first, one of which claims it is 1 cent per load. However I didn't think those recipes worked well. This one probably works better and costs more because of the OxyClean, but I am okay with that because what is the point if my clothes stink? The blog that I got this recipe off of said it is about 7 cents per load. I did the math on a few others to compare:

Homemade: 7 cents per load
Tide: 21 cents per load
Gain: 16 cents per load
Surf: 11 cents per load

So regardless of what you use, you save money. And is smells nice :)


Tuesday, August 21, 2012

Homemade All Purpose Cleaner

All Purpose Cleaner. Love those 3 words. With 3 kids, 2 cats and 2 dogs we have LOTS of messes! I do not like have tons of different cleaning bottles. I don't use bathroom cleaner to clean the dishes or anything but if my kid spills something sticky or my refrigerator needs a scrub, or it is bathroom cleaning day, I want ONE bottle for all of the above.
In my search for a homemade all purpose cleaner I found 2 that I decided to try. 

The first one I found here and it was very simple. Only 3 ingredients: Hot water, vinegar, and borax.


Here is what you do:
Mix 4 cups of hot water, 1/4 cup vinegar, and 1/2 teaspoon borax.
That is it! Just mix it together and put in a spray bottle to use whenever you need it!

How did I like it, you ask?
It did just as well at my Windex Multi-surface cleaner. Not really a miracle at soap scum(which is ok because of this AWESOME cleaner), but it did clean mirrors without leaving streaks which I am happy about. We have really hard water that tend to leave a ring in the tub, especially in the kids' tub. The only thing I have found that gets it off without some scrubbing is a Magic Eraser or the soap scum cleaner I have already posted about here. Since I have no idea what it in a magic eraser I am still looking for a homemade alternative, so if you have any ideas of something so magic that it takes permanent marker off of a window sill, please do let me know.

The second option I found here. It is also simple except for one ingredient. Orange or Lemon essential oil. Why Walmart can you not sell special stuff like this?? Why must you make me drive all the way to HEB where I get sensory overload by all of the amazing smells and products in there that I would LOVE to waste my money on, but that would defeat the purpose of the cheap homemade cleaner that I am trying to make with the ingredient I came to HEB for!! I thought about simply skipping this ingredient, BUT the recipe claims that in addition to a nice smell the citrus cuts grease. I have been researching other cleaners and several have suggested lemon or lavender oil to mask the vinegar smell, so I figured I would use it for other things anyway. So, after a trip to HEB, I gave this one a shot.


Here is what you do:
Mix 1/2 teaspoon baking soda, 2 teaspoons borax, 4-5 drops of orange or lemon essential oil, and 2 cups hot water.

How did it compare?
Well, I really liked the way it smelled. I used Orange essential oil. I felt like this one cleaned a little better however it left the mirror streaky so in my book you can't call that an "ALL purpose cleaner" more like "most purpose cleaner" I still liked this one better than the first option though so I am afraid I may just have to have a separate bottle for mirror and window cleaner.

Um... also, on this one, you really do need the essential oil so don't make the rookie mistake I did and try to just use lemon juice (I know it does sound dumb...don't laugh at me too much) because it will leave major streaks on mirrors like this:


Here is my cost comparison. I added one more natural brand for comparison depending on what you would normally buy. Also, keep in mind that the ingredients of this homemade cleaner are all on the natural ingredient list which means it is better for you than the chemicals in some of the others.

409 cleaner: 1.98 for 22 oz (.09/per oz)
Lysol all purpose cleaner 1.97 for 32 oz (.06/ per oz)
Windex Vinegar Multi Surface Trigger, 32 oz for 2.87 (.08/ per oz)


Homemade option 1: about 8 cents per bottle made!
Homemade option 2: about 3 cents per bottle plus the cost of the oil *cost varies between oil types, I paid about $4 for the orange oil, but it will last a while since only a few drops are needed per bottle

On more note, in either of these recipes you can replace the baking soda with washing soda.

Washing soda is stronger than baking soda so it is suggested that you wear gloves and a mask when cleaning with it but it does still pass the natural ingredient test. I did not use it simply because I felt that the cleaner did the job without it. I did buy some washing soda for a different cleaner I am going to make, so I may try it at some point just to see if I think there is a difference. I am just not super interested in wearing a mask to clean...

Tuesday, August 14, 2012

Menu Planning

So, I had my first blog request, which made me super happy because it means that someone is actually reading this! ;) My sweet friend Marianne asked how I menu plan and what my favorite meals are. First of all, my favorite meals are anything that my kids will eat that I can sneak spinach into :) I think I will have to do a sequel to this post with some of those recipes, just don't tell my kids! ;)

Menu planning is a must to me. Not just because I am a little obsessive when it comes to organization sometimes, which I am. So obsessive in fact that I have an excel spreadsheet of my daily schedule.... and a separate spreadsheet for our home school schedule. I know, I know, it is a little much, but I need it to survive!


I can't remember a time that I did not make a menu and frankly I don't know how to make a grocery list without a menu. There are some websites that you can use to get recipes and make a menu. One is http://www.relishrelish.com/. It costs $7 a month but give lots of recipes to choose from. I think you can do a 30 day trial too. Another that helps you shop the sales is www.foodonthetable.com/ Dave Ramsey recommends www.emeals.com/dave-ramsey  Honestly, I have used them sometimes in the past, but I think it is quicker and cheaper FOR ME to just use my own recipesand make my own list. It really doesn't take that much time.

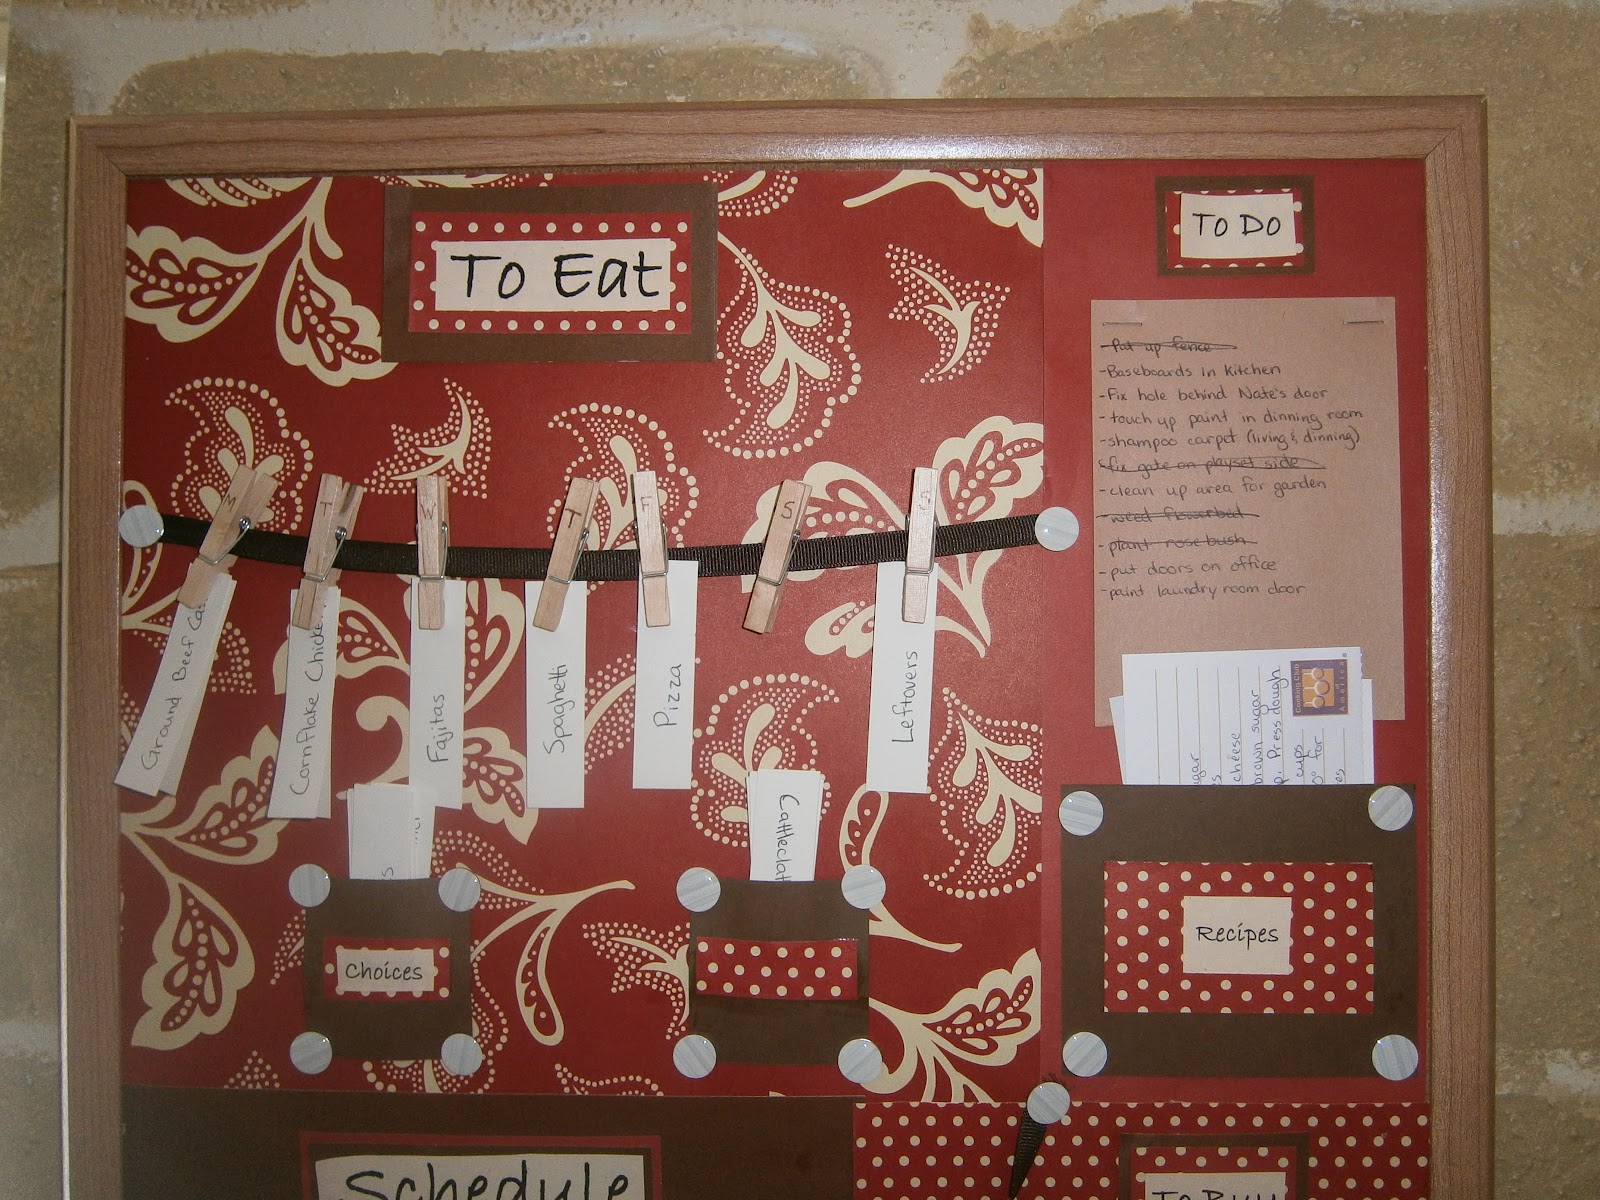
I have used calendars or planners in the past or even a dry erase calendar that stuck to my fridge, but several months ago I made this Pinterest inspired meal planning board to help me. There is a clothes pin for each day of the week. Friday never changes because that is our family pizza and a movie night. :)


Below my little menu clothes line, you see 2 little pouches. The first pouch is where I keep my menu item slips and the second pouch is my "next week" pouch because I plan and shop for 2 weeks at a time. I do that because one, I hate going to Walmart, and two, I am way to busy with home school, work, and other general "home maker" things to go shopping every week.


I have written out on little slips of card stock all of our favorite dinner items including main dishes and side items. I sit down and pick out what I want to cook over the next two weeks. I try to make sure that we are not having beef for 3 nights in a row, or the same veggie side 4 times in one week and I just pick however many items I need to fill up my menu. I make sure to take into consideration food items that go bad quickly. For example if I want this dish that I LOVE called Delicious Skillet Chicken (click for recipe, I modify by using fresh tomatoes instead of canned and add the seasoning myself) that uses a lot of fresh veggies, I will make sure it is on week one of my menu. If I am making something like Spaghetti or Cola Chicken (again, click for recipe) with a side of frozen mixed veggies (cooked of course!) then that can go on week 2 because none of the ingredients will go bad before then.

What I love about this method is if we have a night that we decide to eat leftovers or eat out I can just rearrange the menu to make sure that I use up anything fresh that would go bad and save the other menu items for when I make my menu for the next two week period. Also if I look at the menu and don't feel like eating what is on that day, I just switch it with another day! ;)


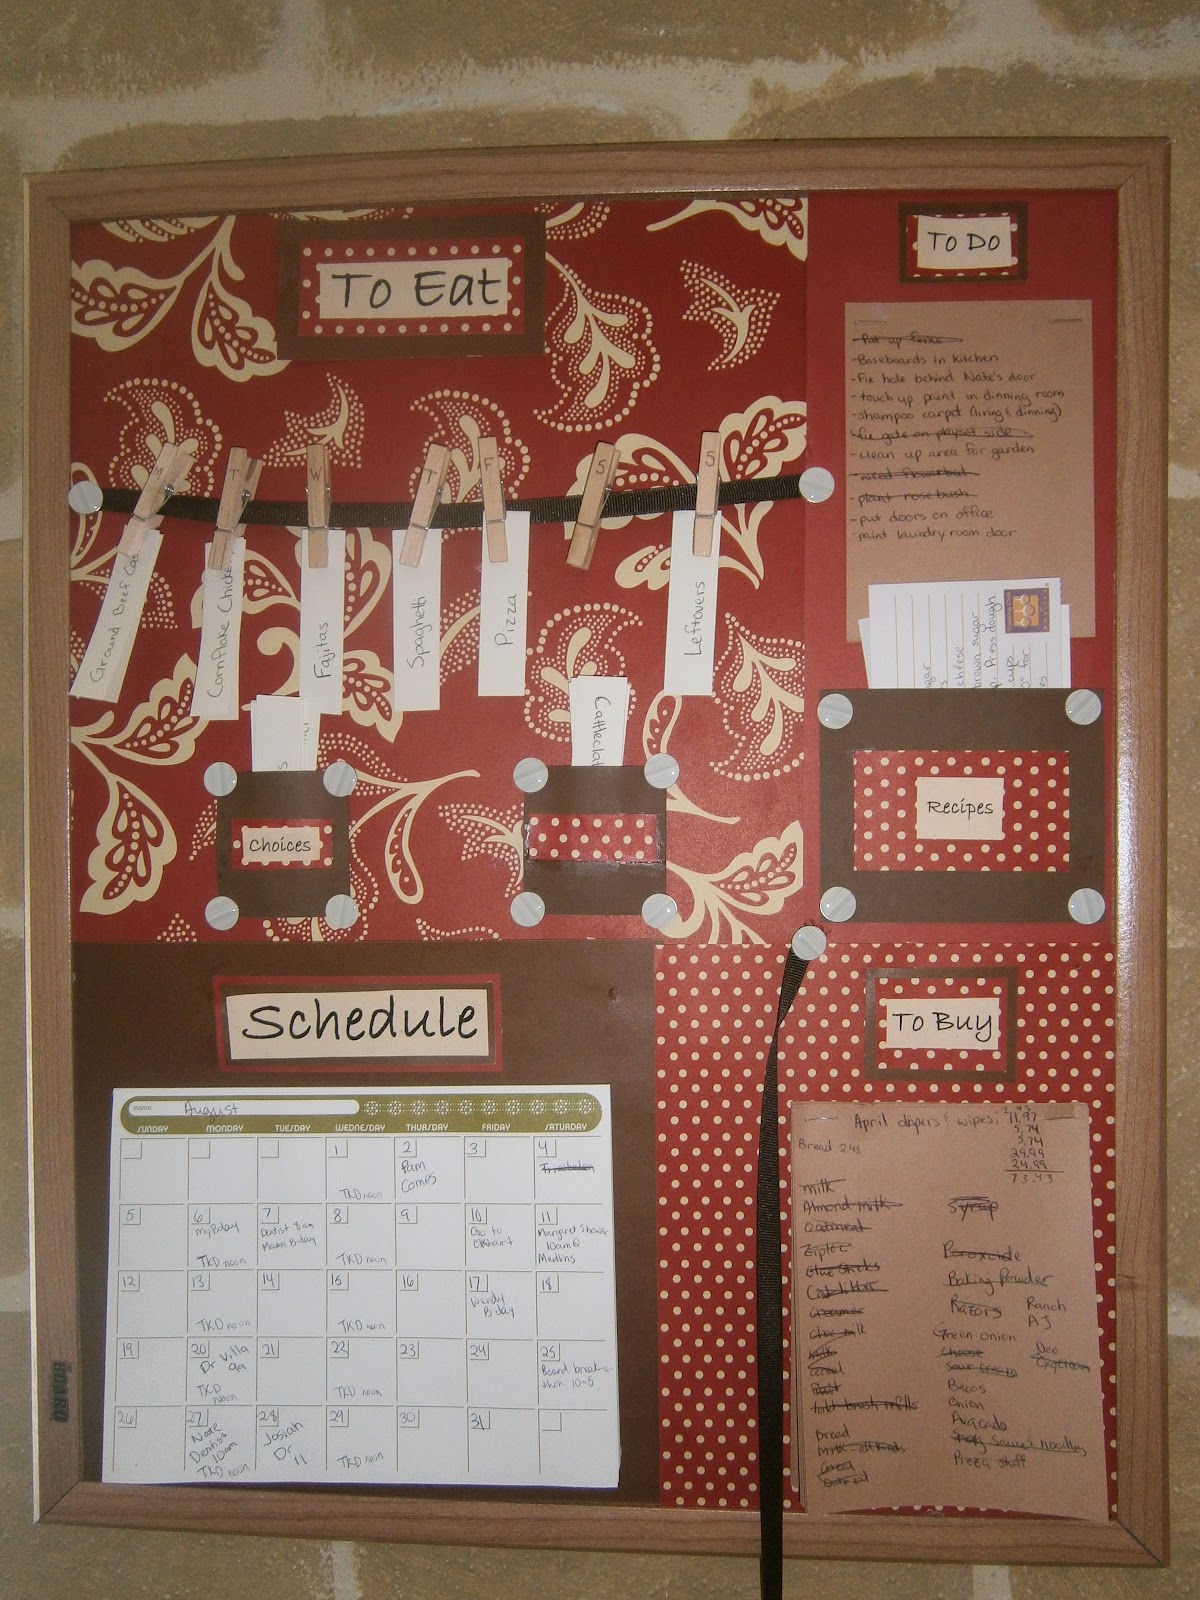
To the left of my menu I have a pouch for the recipes I will be needing for the 2 week period. I keep my recipes in a box when they are not being used. So when I pick my meals I pull out the recipes and make my grocery list from that. I normally do my whole process of making the menu and list while my kids eat breakfast the day I plan on going to the store. It really DOES NOT TAKE THAT LONG. It is so worth not having to think about what to cook everyday and making multiple trips to the store and above all it saves money. I am sure that there are ways to do this with coupon clipping and shopping the ads, but I just shop at Walmart where most things are cheaper and keep my eye on the ads because they price match. If you want another good source for menu planning ideas, I like this blog post about it.
This is just a quick picture of my whole "planning board" I found that small calendar in the office supply section at Walmart along with the tiny clothes pins and pretty thumb tacks.

I plan on doing a separate post about my favorite meals and my cheapest meals, but Marianne did ask about my favorite meals so I will post a couple here to tide you over. ;)

I already put the links to a couple of my favorites above but here are a couple more:
Chicken Pot Pie = SUPER easy
1 pkg roll out pie crust (I am working on a homemade whole wheat version, stay tuned!)
1 can chicken
1 can cream of chicken (I saw an alternative to this on Pinterest that I am going to try too!)
1 (10oz)pkg frozen mixed veggies
Whatever herbs you like
Pretty simple, just mix it all and put it in the pie crust and bake at 350 for about 45 minutes (if the veggies were thawed, longer if not). I usually put oregano, rosemary, and basil. Don't be afraid to try different things. I have put in green onions, celery, or spinach. I bet zucchini would be good too.

I also love making fajitas with just boneless skinless chicken breast covered in fajita seasoning (not the kind in the little bag thing by the taco seasoning, but one that is in a tube in the seasoning section) onions and peppers grilled, maybe some avocado, cheese and sour cream. I also put fresh spinach in sometimes because I put spinach on everything. You might get tired of reading "put spinach on it"  when reading this blog, but it is just so good for you and versatile! 

Tacos are another favorite along with spaghetti. One of my husband and kids favorite is hamburger rolls. I am going to feature this recipe in a sneaky spinach blog so that you can see just how much spinach you can hide in these, but for those of you that can't wait...


Brown 1 lb of ground beef, add onions until it looks good to you (everyone has such different feelings about onions!) cut or tear up spinach and add to the meat and onion while it is still on the stove top so that the spinach will wilt. Now turn the burner off and add cheese stirring it around until it melts.Spoon it into two packages of crescent rolls and cook according to the crescent roll instructions. You really could play with these and add olives, mushrooms, whatever sounds good to you.

Okay, that is all for now, I will post more recipes later!

Monday, August 13, 2012

Sugar Scrub for Keratosis Pilaris (or just for softer skin!)

As promised, here is my first bath and body product post. I have a list of different things to try including bath salts and pore treatments but today I have a simple sugar scrub.

No really, I mean SUPER simple. 
Only two ingredients.


Olive Oil and Sugar. 

I saw came across this on a clip from the TV show The Doctors. I have never actually watched that show, (because who has time for TV during the day?) but I saw this clip on my AOL homepage and it was intriguing so here we are. :) 

There was a girl on the show that was complaining about these little red dry bumps on the back of her arms and on the tops of her thighs. I so have that! So does my sister, my son, and my daughter. Turns out that there is a name for it! 

Keratosis Pilaris. <Yes that is a link to read about it.

Apparently it is pretty common and some people have it way worse than I do! Anyway, "The Doctors" offered a couple of different home remedies. One was dandruff shampoo on the bumps. Tried that, got no where. One was something to do with crushed up aspirin, sounded like a pain and a waste of a lot of aspirin. So I tried the third option! :)

A sugar scrub!

You simply mix the sugar and olive oil until it is at about this consistency and then use it like any other sugar scrub. I keep it in a Tupperware container in my shower to use every time I shower.


I found that it did help quite a bit and definitely made my arms softer, but the bumps are not totally gone. I just read to use witch hazel on it so I am going to start doing that too and see if the 2 together help. I will let you know what I think after trying it for a week or so. Either way it did make my skin softer so even if you don't have KP, it is a nice, simple way to soften your skin! (and I think it smells good too!)


Friday, August 10, 2012

Homemade Sports Drink

My hubby and I are training to run a half marathon in October, Yes, I do realize that is 13.1 miles, and yes it is possible that I have lost my mind, but we paid for it last week so now I can't back out! ;) With all of our running and sweating in this hot humid Houston weather, it is important to stay hydrated. When we are running and sweating as much as we have been we need more than just water. We had been using the powered Gatorade mix but then, while surfing Pinterest I found a recipe for a homemade version on this blog. I am very pleased with the results!

Depending on the brand of orange juice that you use, it costs about the same amount as the powdered Gatorade but I think it has better benefits for what I am looking for. Although everything in Gatorade is FDA approved, I like that by making my own I know EXACTLY what is in it and that does not include artificial colors or flavors or extra stuff that I can't pronounce! ;) If you are interested what all is in Gatorade, this is a good source.

I used My Fitness Pal (which I will tell you about in another blog post) to calculate the amounts of sodium, potassium, sugar, etc that is in the homemade version and compared it to Gatorade. I found  that this recipe has 10mg more sodium and 27.7mg more potassium which is good for when we are dripping sweat in this insane humidity. Despite have more of those 2 things, it only has 10 more calories, .7g more sugar, and 1.6 more carbs (which carbs are not necessarily a bad thing when working out). So, I was super pleased with these facts.

Here is what you need:

1 cup orange juice
1/2 cup granulated sugar
1/2 tsp kosher salt or sea salt
2 tbsp lemon juice
water
(This makes 2 quarts)

Here is what you do:
Add the salt and sugar to 1 cup of hot water, stir until it is completely dissolved. 
Add 1 cup of orange juice and 2 Tablespoon Lemon juice
Add some ice cubes too cool it faster and fill the rest of the 2 quart pitcher with water
This recipe passed not only my taste test, but it also passed my 3 year old, 5 year old, AND husband test! I consider that a HUGE success! :) Enjoy!

Thursday, August 9, 2012

Children are a Blessing Wall Art

I am blessed to have 3 beautiful children and I was looking for a neat way to display their pictures. I had seen in a friend of mine's house once a photo board involving scrapbook paper and her baby's picture and that is where I got my inspiration. That and Pinterest, of course. So here is what I did:
 
 Cut scrapbook paper to fit on a 12 x 12 canvas (I did 4 for my project and waited until Hooby Lobby had a canvas sale).
 Use Mod Podge and a foam brush to attach the paper. Paint the canvas with mod podge, put the paper on, then paint over it. Try to do this without too many bubbles in the paper, but don't worry if there are some because it will most likely dry flat.
 After the initial paper drys a little bit (does not have to dry completely) mod podge on the pictures and whatever other decoration you want. I had my pictures printed in sepia because I thought it looked good with the paper I chose.
 Do you see how bubbled up this is? I was totally FREAKING OUT thinking that I had just wasted time and a canvas and paper, but amazingly it dried flat!
 I then used a stamp of my mom's that makes things look distressed. You could also just smear an ink pad if you want to.

This is how it looked after the stamping. Next I painted the sides of the canvas. I was not super careful at all, not caring if paint got a little on the front of the canvas because I wanted it to look distressed anyway.
 Here is the paint I used
Put the canvas on top of a cup to make it easier to paint and then leave it there to dry.

Love the end result! For the record... I bought extra matching scrapbook paper for any future kids that may come along. ;)


I do a data entry job from home on my computer and I like to listen to sermons and things online while I work. Since we are on the subject of children, click here for a great series from FamilyLife Radio about biblical family planning and how we should view children.

Here is a quote that I LOVE from Dennis Rainy from that series:

"Children are our legacy. They save us from our selfishness, from our
materialism. Children are the spiritual messengers that we send to future
generations with the Gospel. Children should be viewed from God's perspective
not from the world's perspective. The world views them as a burden. The
Scripture speaks of them as being a BLESSING."

Wednesday, August 8, 2012

Smoothie (shhh, there is spinach)

One word: Yum. This is an idea that I originally got from a conversation I had with a couple of my friends. One of them was Anne Mahon  who is a dietitian/mom of 3 (click her name to check out her nutrition blog)
 The blender. This is my most used kitchen appliance. Well other than the coffee maker. (Can I get an Amen?) Almost everyday I make smoothies. My kids actually ask for them all the time and if you promise not to tell them, I will tell you a secret. The smoothies are SUPER healthy! SHHHH!
Yep, that IS spinach. Quite a bit of spinach. It is AMAZING how much spinach you can hide in a smoothie without tasting it. One tip on the spinach: use fresh, not frozen. I have done both and frozen just does not blend the same. My son even told me once that I had "put too many leaves in this smoothie" So I start with a banana and spinach. The banana can be fresh or frozen. Why would you have a frozen banana, you ask? Well if your bananas are about to go bad, peel them, put them in a freezer bag and freeze them for later use in a smoothie. Waste not! An IMPORTANT tip on freezing bananas....DON'T skip the PEEL IT part. You WILL regret it, trust me...
So, in your blender you should have a banana and spinach. Now add a piece of fruit. Don't you love recipes that are completely NOT specific? I know, I usually hate that too, but in this case you really can't go wrong. I have used an apple, pear, pineapple, mango, grapes, an orange,  or strawberries. Throw in whatever piece of fruit you have lying around.
I always add a little bit of water to help it blend better. Start with about 1/4 of a cup and then as you add stuff if you want the smoothie to be thinner, add more. You can also use juice instead of water. I used to use V8 fusion, but stopped when I started watching how many calories I eat in a day. I now have a really hard time "wasting" calories on a beverage. Water is my friend.
This is my favorite part. When you blend those things together this is what you get. Green liquid. Green because of all of that healthy spinach. I LOVE spinach! It is so good for you and so easy to sneak into things. Don't worry there will definitely be a blog post about my spinach love with other sneaky ways to feed it to children. 

Moving on... Now add frozen berries. No specifics on this either. My kids really like this kind:
I recently discovered this tropical one at Costco and I love it. The kids will drink it either way, but prefer if I put at least a cup of the 3 berry mix above.

My current favorite is about a cup of the 3 berry mix and 2 cups of the tropical, but you really can mix it however you want.
After adding the frozen berries let the blender work for a while. Don't just stop when it quits making grinding noises because it won't be smooth enough and you will notice more blackberry seeds. Add water or juice until you get the consistency that you want.
And there you have it a blender full of yummy healthy goodness that even your picky kids will eat, or should I say drink...
I do think for me and the kids almost everyday, but if my hubby is home I fill the blender all the way up so he can have some too because yes, Thomas Cumming, I fully believe you would eat nothing that was healthy without me telling you to! ;)
My smoothie blog would not be complete without pictures of my adorable munchkins suckin' them down!
Nate 5yr
Adah 3yr