Friday, October 26, 2012

Laundry Soap Update

So, if you have read my blog about laundry soap options, I have a new and improved version of the one I had suggested. Here is why:

I gave my sister some of the soap I had made that had Fels Nathpa in it and she got an itchy rash. She was not sure if it was the soap or something else, but it did lead her to look up info on Fels Naptha. Turns out that some people say that it makes them itch. So, thanks to my sister's research(and itchy suffering) I decided to try Zote Laundry Soap instead. I had originally just used Fels Naptha because the recipe said to, so why not try something new?


Her research said that it is a better option why it comes to skin allergies and I found that not only was it easier to work with, it smells better! I was never a huge fan of the way the Fels Naptha smells on its own, but I overlooked it because the lavender masked it. I really like the smell of the new laundry soap though!


Here is what you need: 

2 cups Borax
2 Cups Washing Soda
1 bar Zote Soap (it is a thick bar)
2 1/2lb Oxy Clean
30 drops lavender essential oil

The Zote is softer than Fels Naptha so it I just cut it into chucks and put it in my food processor (have I mentioned how much I love and could not live without that thing?) process it until it makes tiny little balls of soap and then add the Borax and blend in to keep the soap from being to sticky. Then put in all into a big bowl and mix in the other ingredients. 

I have been using this soap all week and really like it better. I am really glad that my sister got an itchy rash! Sorry, that you had to suffer though, Wendy! Just think how you helped me find a better homemade laundry soap recipe!

Thursday, October 25, 2012

Spniach Artichoke Hummus

So you know I LOVE to sneak veggies into things my kids eat. This one has actually been a huge hit because kids love to dip things. It started when I was pregnant with #3 and could not resist walking by this Spinach Artichoke Hummus at Costco anymore! So I bought some and not only did I love it, the kids loved it! 
The problem: it was kind of pricey for someone as cheap as me. Solution: look at the ingredients on the back and several hummus recipes online and make one up! So here is the recipe I can up with:


1 Tablespoon olive oil
1 Tablespoon Sesame oil
1/2 teaspoon salt
2 garlic clove minced (or 1/2 teaspoon garlic powder)
3 Tablespoons lemon juice
2 (15oz cans garbanzo beans (liquid reserved)
1 (14oz) can artichoke hearts (drained)
1/2 red bell pepper
4cups spinach

Saute the garlic and red bell pepper in the oils until tender. Meanwhile, dump the beans and artichokes in the food processor and blend. Steam or saute the spinach (whichever you prefer) to get it nice and wilted. Add spinach, garlic and bell pepper (with oil), lemon juice, and salt to the food processor with the bean/artichoke mix. Puree until mixed adding the juice from the beans to get it to the right texture.


 It makes a huge amount, so you might half it the first time to make sure that it is going to get eaten. We like to dip veggies, Stacy's pita chips (which I am ADDICTED to), and veggies straws in it. My daughter will sometimes eat it and sometimes not, but my son scarfs it down every time! The hubby likes it too, which is always an added bonus! :)

Saturday, October 13, 2012

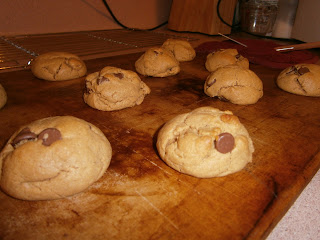
Insanly Good Peanutbutter Chocolate Chip Cookies

I will just start by confessing that these are not healthy or fast. I am afraid to even calculate how many calories is in one of these little pieces of deliciousness. Therefore this is different than 99% of the posts you will see on my blog, but it is really good and it settled an argument between my kids so it is um... useful. This is one case where they are so good that I JUST DON'T CARE! :)

The kids were arguing this morning over what kind of cookie we should bake. Adah, as usual wanted chocolate chip. She goes by a little pearl of wisdom she learned from Gingersnap or Strawberry Shortcake "A cookie without chocolate chips is like a face without a smile." And that my friends is why I consider Strawberry Shortcake "educational television". Nate, however, wanted peanut butter cookies. Never fear, children! Mom's got the solution! 

I got this recipe from one of my best friends in the world Amy Roberts. The first time she made them, I probably ate 5. They are SO stinking good! Anyway, here is the recipe and instructions:

First step: Aprons, baking just isn't as fun without them! ;)
Not sure what look Nate was going for here.

  • Ok, now cream together 1 cup of butter (2 sticks, I warned you these were not healthy!) and 1 1/2 cup brown sugar.
  • Beat in 2 eggs, 1 cup peanut butter, and 1 t vanilla
  •  In a separate bowl whisk together 2 3/4c of flour (I use King Aurthur brand white whole wheat), 1/4c cornstarch, 3/4 t salt, 1 t baking soda, and 1/2 t baking powder
  • Now mix it all together. If you don't do much baking, let me suggest not dumping all of the flour mixture in at once unless you want to look like an episode of I Love Lucy. :)

Now last but definitely not least, add the chocolate chips. The recipe calls for 1 cup, but I tend to put a little extra for um... good luck? to grow on? Yep that's it... to grow on... to grow on my thighs, that's for sure.

 Resist the temptation to eat all of the dough right now...


Roll into 1 1/2 inch balls and space about 2 inches apart. Bake at 350 for 10 minutes. And enjoy! :) You might want to use a fork to smoosh them down a bit before you bake them like regular peanut butter cookies.


For those of you that are a bit OCD like me and need an ingredient list, here you go:
1 Cup Peanut butter
1 1/2 cup Brown Sugar
2 Eggs
1 Cup Butter
1 Teaspoon Vanilla
2 3/4 Cup Flour
1/4 Cup Cornstarch
3/4 Teaspoon Salt
1 Teaspoon Baking Soda
1/2 Teaspoon Baking Powder
1 Cup Chocolate Chips  - Well, at least one cup! ;)

Homemade Baby Food

Okay parents, when I had my first baby that thought of homemade baby anything sounded like too much work to me. Now I kick myself for not giving it a shot! If only I had known how easy and how much cheaper making my own baby food was, I would have NEVER bought it! Not to mention that it tastes SO much better (seriously, I would eat it) and since I make it I know exactly what goes into it and i don't have to worry about what is in it or how clean the baby food making factory is. So trust me, if you haven't tried this, it is SO worth giving it a shot.


You can make any kind of baby food from veggies, to meat, to rice cereal to oatmeal! I have not had much luck getting my kids to eat the homemade rice cereal. I guess I have not yet mastered getting it mushy enough. They have eaten my oatmeal though.Since I don't do the cereals often here is a good resource if you want to pursue it. I will post about meat in a future post, but it pretty much just cook it and puree it.

For veggies and for fruit I am a big fan of either fresh or frozen. I don't really like canned stuffed, but if you do you can use them too. I love frozen because it is picked at the peak of nutrition and flash frozen so I feel like it is probably the best for you. I also just don't think canned versions taste as good.That is just my opinion, to each is own. 


I use a food processor to puree mine, but if you don't have one, some blenders will puree. When I make my baby food, I like to freeze it in ice cube trays then put it in freezer bags to use as I need them. That way you can grab a sweet potato and mix it with a broccoli and have some fruit for dessert. (That is my little guy's favorite)


Vegetables:

The instructions are pretty much the same for all veggies... cook it, puree it, add water if needed to get the right consistency. So to break it down:

Carrots, Broccoli, Spinach, Cauliflower, Green Beans, Peas: Steam them until soft then puree
Butternut Squash, Sweet Potatoes: Bake, then puree
Zucchini, yellow squash: Boil then puree

If I left any veggies off, just cook them as you normally would and puree. Most veggies you will need to add some water to get the right consistency. If you have boiled or steamed something, use the water that you used to cook them because it will have more nutrients from cooking the veggies.


Fruit: So easy

Fruit is juicy enough that you don't need to add water. Pears, peaches, apples, mango, banana, are great. Just peel them cut out the seed(s) and puree in the food processor. You have to be careful on berries because some berries are so seedy that they don't puree very well so they might not have a great texture. Also, berries have a stronger taste than some fruit so what I do it fill the ice trays half full to make smaller portions of berries and then mix it with another fruit. Josiah currently loves bananas with blueberries in his oatmeal. My 3 year old, actually asked for some in her oatmeal the other day so I plunked a cube of banana and a cube of blueberries in hers too! Some of the fruit like pears and apples tend to be really juicy so I mix the dry baby oatmeal with it to thicken it. 


Serving it up:

When it is time to eat, I just pick a couple cubes and thaw in the microwave. I try different mixed just like the store bought baby food does. Throw in a cube of squash and a cube of corn or whatever. Sometimes I even sprinkle in some whole grain cereal to thicken it up if needed. As your baby gets older you can also start leaving it chunkier when you puree to start transitioning into "table food".


Traveling:

You may ask what to do I do when we go out of town. Well, that actually just happened so here you go! I make a list of how many meals he will need and count out the cubes into tupperware containers. Put it in a cooler still frozen without ice and it will thaw itself. Once thawed either put it in the fridge when you get to your destination or keep ice in the cooler if you don't have access to a fridge. We recently did that and the ice kept it nice and cold.